Showing posts with label cooking. Show all posts

Sunday, October 25, 2015

Check Out My First Experience Cooking on Induction With an Inexpensive Induction Burner I Just Bought at Aldi’s

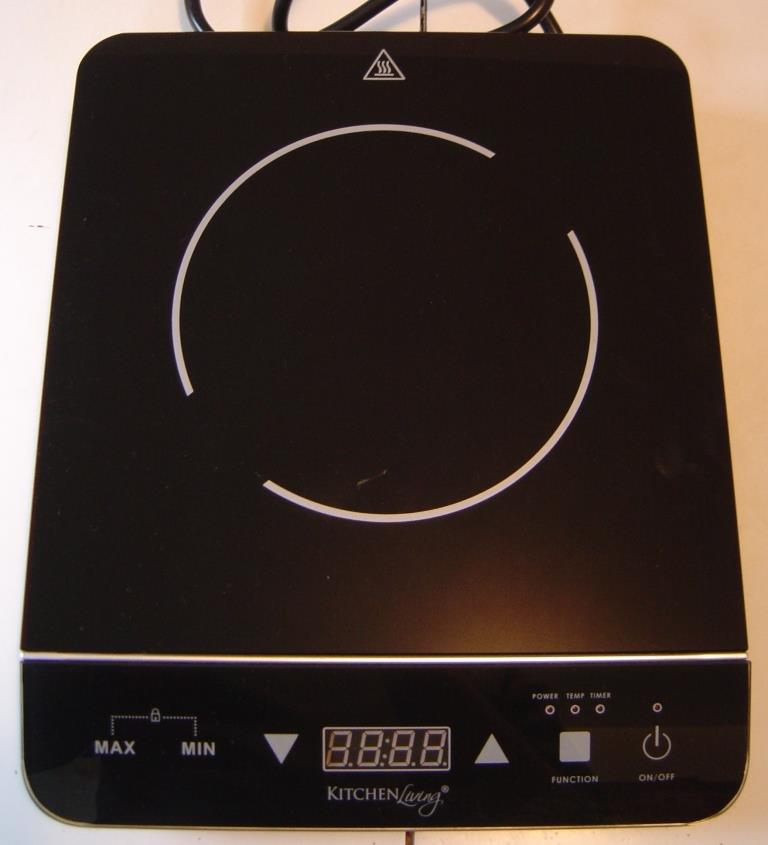
My Induction Burner.jpeg
I paid just $39.99 for this 1800 watt Induction Burner at Aldi this week.

Induction cooking is something I have been wondering about for a while.  Currently, I use an electric stove and oven.  However, this form is supposed to work as fast as or faster than even gas and use much less energy.  Nonetheless, it is a pricey gamble when you think the price for the full size 30-inch induction range would be more than $1,500.00.  

Before making that investment without knowing how well it would perform, I thought it would be best to get a feel of how it cooked by buying an induction burner.  America’s Test Kitchen recommended if you get an induction burner it’s better to get one that allows up to 1800 watts.

I saw the advertising on TV for that NuWave induction burner that I was considering to test first before I found a special buy the other day at one of my favorite store’s Aldi’s with their Kitchen Living Portable Induction cooktop for only $39.99.  This cooktop gave me the 1800 watts, which is as high as you can go on a regular plug.  Any higher and you are talking about full range type electrical connections so I snagged one up while they were available.

This model is small but fits a sizeable 6.5 quart stock pot with ease.  So my first project just boiling water and making some pasta was easily done.  All I did was sort through my pots and I found a number of them that a magnet would stick to.  Some won’t work and that’s a factor you also need to think about the possibility that you also might need to buy new pots before cooking with induction.

I’m still tweaking this and need to figure out the right temperatures and/or power settings.  On my induction cooktop you can select either a power setting up to 1800 watts or a temperature.  In the past I just dialed my stove to preset the power setting.  Induction let’s you pick the temperature you like, which is certainly new for me!

Does anyone have some recipes or tips to share?  I would really appreciate all and any advice that you have to share with me.

Saturday, January 26, 2013

Recipe: Reinvent Leftovers With My Delicious Dinner Crepes!


The recipe that I have for you today is definitely a fancy main course that takes leftovers and transforms them into the ultimate weekend dinner indulgence with my dinner crepes.  

Imagine a delicate textured pancake wrapped around browned chopped onions and fresh mushrooms in a creamy cheese sauce along with leftover chicken, turkey or ham.  Top those filled crepes with more cheese sauce before taking out of your oven and what you get is out of this world delicious meal enjoyment.

Though my dinner crepes take a bit of extra effort and time, they are well worth the trouble.  All I ask is for you to try them once and taste them for yourself.  Trust me, no one will ever know they are eating leftovers once you serve this.  This will be our little secret!


Dinner Crepes Nuts Style!

Crepes:


2-1/4 cups sifted  flour
3/4 teaspoon of salt
1/2 teaspoon of baking powder
3 cups of milk
3 eggs
2 tablespoons canola oil or a melted margarine (not spread)


Filling:


4 tablespoons of margarine (not spread) or canola oil
2 medium onions, chopped
6 tablespoons of flour
3 cups of milk
1 teaspoon of salt
1/4 teaspoon of bottled hot red pepper sauce
1 cup of shredded cheese (Swiss, American or Brick)
2 cups of fresh mushrooms, chopped
2 cups of leftover chicken (ham, turkey, beef)
3 tablespoons margarine (not spread) or canola oil

To Prepare the Crepe Batter: 

Mix flour, salt, and baking powder together in a large mixing bowl.

Stir in the milk, eggs, and melted margarine or oil.

Beat with an electric mixer or by hand with a whisk until smooth.

For each crepe, lightly brush an eight-inch skillet with that melted margarine or oil; heat over medium heat until bubbly before pouring 1/4 cup of batter into the skillet.  Tilt the skillet until the batter covers the bottom.  

Cook the crepe until the top is somewhat dry, then turn over and cook the bottom until lightly brown.

If you plan to do these crepe ahead of time, place waxed paper between each one.  You can keep them for two days in your refrigerator and no longer than three months in your freezer.

To Prepare the Filling:

Saute onions in the  four tablespoons of margarine until tender but not brown.

Mix in the tablespoons of flour and cook about one minute, stirring constantly.

Then gradually add the milk and cook until the mixture thickens.

Remove from the heat and add the salt, red pepper sauce and cheese.  (You can add any spices and herbs to change along with the meats you use, if desired.  However, I don't feel it is necessary for this recipe.)

Reserve 1/2 cup of this sauce for the topping.

Fry the mushrooms in the three remaining tablespoons of margarine or oil until lightly browned.  Add this to the cheese sauce as well as the leftover chicken or the meat you want to clean out of your refrigerator.

To Assemble The Crepes:

Preheat your oven to 350 degrees.

Place 1/4 cup of filling into each crepe.

Roll the crepe around the filling and place in a greased, shallow baking dish.

Bake the crepes, covered with aluminum foil, for thirty minutes.  Then uncover and place the remaining cheese sauce over the crepes and place under the broiler for three minutes until lightly browned.

This serves six.

ENJOY!


Thursday, December 29, 2011

Need a Tasty Appetizer like My Cheese Stuffed Mushrooms for Your Holiday Party?

I happen to love mushrooms in any shape or form.  This recipe is really great because you can make it ahead of time to store in the refrigerator without worrying about messing up your kitchen.  All you have left to do is to grab that dish and pop into your oven later once your guests arrive.

Don't worry about the tiny bit of garlic in this recipe.  Just grab a breath mint or head to the bathroom for a quick gargle because this is too delicious not to enjoy while it will make you look like some culinary star once you serve these tasty hot delights.

I hope you do try these because they are special and I wanted to share them with YOU!

My Cheese Stuffed Mushrooms

1/2 cup white bread, cut into cubes (about 2 slices)
12 large fresh mushrooms
2 cloves of garlic, finely minced
2 eggs
1/2 cup of cottage cheese
1/4 cup olive oil
1/4 teaspoon dried oregano leaves
1/4 cup of grated Parmesan cheese

Soak bread in a little water, then squeeze dry and shred  in your mixing bowl. 

After you clean your mushrooms, chop the stems, garlic and brown lightly in half of the olive oil. 

Take off the heat  and add this into your mixing bowl along with the crumbs, eggs, and cottage cheese.

Stuff the mushroom caps with filling and arrange them, cap side down on a baking dish rubbed lightly with some of the oil.  Sprinkle the Parmesan cheese on top and drizzle the rest of the olive oil over the tops. 

Bake at 400 degrees for about 20 minutes.