Showing posts with label recipes. Show all posts

Wednesday, April 11, 2018

My Crock Pot Chicken-Rice Dinner Recipe Eases Up Meal Preparation

crock-pot-chicken-rice-dinner.jpeg
My Crock Pot Chicken-Rice Dinner can free up a busy day.


Being attached to my stove or working harder than I need to are not my idea of what cooking should be like.  I believe if a recipe has too many steps that waste too much time or calls for expensive ingredients, then it is not for me.  Instead, a recipe has to be simple with common available ingredients besides being delicious.  I’m sure there are plenty of others that don’t mind following lengthy procedures or spending a lot more for ingredients, but why bother when you can create incredible dishes without all the fuss and expense?  

The Simpler and Cheaper to Make This Main Dish the Better


Now that you understand my philosophy, you can appreciate my great chicken dinner that I have for you today.  This recipe is one of those that I love to make when I have tons to do and don’t want to worry about dinner.  In fact, you can prepare this recipe in two different ways in the crock pot or in your oven.  Either method turns out nearly a complete dinner with the exception of your salad or vegetable to accompany it as a side dish.

My Crock Pot Chicken-Rice Dinner produces a tender, delicately seasoned chicken from slowly cooking it for about six hours on low heat surrounded by creamy rice.  Imagine a sauce of cream of mushroom soup, cream of celery soup, paprika, thyme, parsley, salt, pepper, and one envelope of onion soup mix to reinvent the flavor. 


Substitute for Ingredients You Have Doesn't Hurt


If you check your pantry and don’t have any dry onion soup mix on hand, you can improvise and substitute one-half cup of freshly, chopped onion.  The same goes for your mushroom soup or celery soup.  You can use two cans of cream of mushroom soups or two cans of cream of celery soup.  You can even substitute a can of  cream of chicken soup for one to change the recipe with what you have.  I have made this recipe with so many different variations without losing any delicious aspects of this dish while saving me an extra trip to the grocery store.  

I usually use a few chicken breasts, but you can use thighs or drumsticks whatever you prefer.  

You also can bake this recipe in your oven in a covered casserole at 350-degrees for about two hours or so.  I do suggest checking it after the first hour to stir and see if you need any more liquid before finishing.

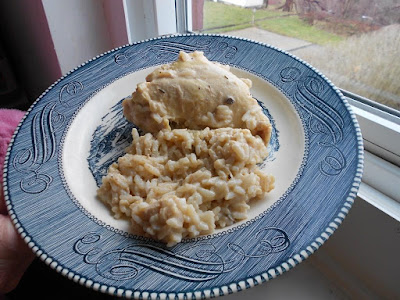
My Crock Pot Chicken-Rice Dinner
crock-pot-chicken-rice-easy-dinner-on-plate.jpeg
My Crock Pot Chicken-Rice Dinner is creamy, hearty and makes a satisfying main dish.


1 cup regular rice
1 can (10.5 oz.) cream of mushroom soup 
1 can (10.5 oz.) cream of celery soup
1 can of water
1 can of milk
½ teaspoons of paprika
½ teaspoons of thyme leaves
1 envelope of onion soup mix or ½ cups of finely chopped onion
3 chicken breasts or 6 pieces of chicken (thighs or drumsticks)
3/4 teaspoon of salt
2 teaspoons of chopped parsley
1/4 teaspoon of black pepper

Place over your rinsed chicken pieces in your waiting crock pot.

Combine rice, soups, water, milk and seasonings and pour over the chicken.  

Sprinkle the dry onion soup mix over everything.

Cover with the lid and then turn on the low heat and cook for about six hours.

Check after two hours to see if you need to add any extra water for your rice.  If so, you can give it a quick stir and add about ½ more water or milk and continue until chicken is finished cooking.  

ENJOY!

Friday, April 6, 2018

My Tuna Penne Casserole Recipe Is Healthy, Simple and Delicious

plate-of-healthy-tuna-penne-casserole.jpeg
This is a healthy, easy dinner.


Nothing pleases me more than doing less work in the kitchen without sacrificing taste or compromising on health benefits of what I’m preparing.  Casseroles are always one of my favorite ways to go because they are easy and a no-worry sort of main dish that requires a minimum of attention.  They also are great when you have leftovers that you don’t want to waste to reinvent a fresh new dish.  However, this is not the case today with the recipe that I want to share with you.  My Tuna Penne Casserole has a lot of reasons why I love it.

Reason One: This Casserole Is One of the Easiest Tuna Main Dishes Ever 


Imagine how convenient it is to know that you won’t need to be chopping and frying onions and garlic as you often do for casseroles.  You do have to fry some fresh mushrooms, but that is all the chopping and frying that you’ll need to do for this recipe.  

The hardest part involved is lining up your ingredients, opening the cans of tuna, cooking up your penne pasta and basically measuring the ingredients before sending it to your oven.

Reason Two: My Tuna Penne Casserole is Healthy and More Nutritious


Cooking healthy main dish courses can take thought and creativity before your family will welcome it as a regular part of your dinner menu.  Some of what I make wins instant praise from the family to serve again while others get the thumbs down for one reason or another.  My Tuna Penne Casserole was a big hit and the gang didn’t even realize it was packed with healthy nutritional benefits.  Instead, they just noticed how velvety and rich the cream sauce was.  

Ha, but I fooled them using plain, whole milk Greek yogurt.  It has that luscious creamy texture that made it so tasty.  At the same time, it provided a bounty of extra protein with 16 grams per serving, probiotics for gut health, plenty of B12, potassium, calcium, and was a lower calorie option to sour cream.  

Tuna fish is another low-calorie protein bursting with vitamins, minerals and hardly any saturated fat in this recipe.  I love cooking with tuna because it is a wonderful choice for helping lower cholesterol, reduce inflammation and what it can do to aid the body’s immune system.  Nutritionally, you get a lot B vitamins like B12, niacin, vitamin B6, and riboflavin.  You also get body building minerals like potassium, selenium, magnesium, and phosphorus.

Mushrooms are another food wonder that deserves attention with all their fabulous health benefits such as a great source of protein, fiber, B vitamins, calcium, selenium, minerals, vitamin C, and ergothioneine.

Olive oil to brown the mushrooms is an excellent way to increase omega-3 and omega-6 fatty acids and monounsaturated fats such as oleic acid to help lower bad cholesterol.  It also has a phenolic compound called oleocanthal that can reduce inflammation. 

Using extra virgin olive oil has even more health benefits.  To be truthful though, I prefer the lighter taste of regular olive oil.  

Parmesan cheese and milk are other ingredients that pump up food value with its protein, calcium and vitamins and minerals.


Reason Three:  This Casserole Is Delicious and a Hit With Young and Old


In my opinion, creamy casseroles are such comforting foods.  They seem to magically lift your spirits when you have a bad day by warming the stomach as well as the heart.  My Tuna Penne Casserole does seem to have that power once you get your first taste.  Maybe it is the slight tang of that cheese-yogurt sauce against the tuna that gives it that extra flavor to that smooth richness that makes this recipe so special along with mushrooms and penne pasta. 

If you want, you can top this casserole with some dry breadcrumbs, more Parmesan cheese and some butter.  I only do that when I have some stale bread that I want to get rid of to make crumbs or seasoned bread crumbs for cooking.     

Reason Four: My Tuna Penne Casserole is Extra Satisfying 


Something else that I honestly notice is how extra filling a serving of this casserole can be.  You won’t be as hungry eating a serving with how much protein is packed in this recipe as you would be a similar tuna casserole.  The real test is up to you to test it out and give it a try.  


My Tuna Penne Casserole

8-oz. cooked penne pasta, elbow macaroni or noodles
2 cans tuna fish (7-oz. size), drained
1-1/2 cups plain, whole milk Greek yogurt
3/4 cup of milk
8-oz. fresh mushrooms, cleaned and sliced
1-1/2 teaspoons of salt
1/4 teaspoon black pepper
1/4 cup grated Parmesan cheese
3 tablespoons of olive oil


For Cheese-Crumb Topping:

1/4 cup grated Parmesan cheese
1/4 cup of dry breadcrumbs
2 tablespoons of melted butter or margarine


Heat the oven to 350-degrees.

Brown the sliced mushrooms in the olive oil.

Cook the penne or whatever pasta you want to use, then drain.

Stir in the tuna, mushrooms, yogurt, milk, salt, pepper and pour into an ungreased two-quart casserole.

Sprinkle the grated Parmesan cheese on top.

If you prefer, you can sprinkle the Cheese-Crumb topping on before proceeding to the oven.

Bake uncovered at 350-degrees for about 35-40 minutes or until your casserole is bubbly.

ENJOY!


Wednesday, April 4, 2018

My Turkey Patties With Mushroom Gravy Recipe Is a Tasty, Healthy Main Dish

healthy-turkey-patties-with-mushroom-gravy.jpeg
My turkey patties with mushroom gravy are simple, healthy and delicious.


When you are trying to find healthy, tasty main dish meals that the whole family loves, the task can be challenging.  However, this particular patty served with mushroom gravy on a bed of rice or alongside mashed potatoes and fresh green beans comes up a winner every time at my house.  


These Easy Turkey Patties Provide a Variety of Health Benefits 


My Turkey Patties with Mushroom Gravy can use ground turkey or ground beef.  I just prefer the ground turkey because it is a better alternative to red meats when trying to limit bad fats and cholesterol.  To further boost health benefits, I add lots of freshly chopped onion, which has compounds that can remove toxins from the body, help with inflammation due to its phytochemicals, as well as lower blood sugar with its two antixodiants of quercetin and sulfur.  Being a flavonoid, onions can also help lower bad (LDL) cholesterol when eaten raw.  

Garlic was another allium vegetable like onions that I put in these patties.  Garlic is loaded with healthy properties from reducing blood pressure, lowering LDL cholesterol to helping the body detox if any heavy metals are present in the blood.  It also can improve a mood, help memory, defend against aging to even serve as a powerful antibiotic when eaten raw.

What else I added were quick oats for extra protein and fiber.  The oats along with a perfect blend of seasonings such as coriander powder, curry powder and hot sauce gave them a subtle, but slightly exotic flavor to the ordinary ground turkey.  Furthermore, the oats built up the patties enough to puff out wonderfully, making them heartier in appearance than a flatness of a typical burger.  Like magnificent meat mounds surrounded in a sea of floating fresh, sliced mushrooms in my special gravy, these turkey patties make a beautiful presentation when served over a bed of cooked rice or alongside mashed potatoes.


Even the Mushroom Gravy Is Healthier and Protein Rich


A simple way to increase nutritional value, extra protein and make a delicious dish like my turkey patties even more enjoyable is by adding mushrooms.  Mushrooms provide protein, fiber, B vitamins, calcium, selenium, minerals, and vitamin C besides the antioxidant, ergothioneine.  

Believe it or not, mushrooms also can help lower cholesterol, assist with weight loss and help with diabetes.  They can also fortify the immune system, which makes them regular staples at our house. 

I hope that you'll be tempted to try my recipe because even the picky eaters at my house clean their plates when I serve this.  


plain-turkey-patties-without-mushroom-gravy.jpeg
Dinner can be ready in no time when preparing these turkey patties.  Here they are before making the mushroom gravy.


My Turkey Patties with Mushroom Gravy


2/3 cup of finely chopped onion
2 cloves of finely chopped garlic
1 pound of ground turkey (or ground beef, if you prefer)
½ teaspoons of ground coriander
½ teaspoons of curry powder
1/4 teaspoon of black pepper
½ teaspoons of hot sauce (whatever variety that you have works)
1 teaspoon of salt
1/3 cup of quick oats
1 large egg
3 tablespoons of olive oil


To Prepare the Patties:

Clean and chop the onion and garlic.

In your mixing bowl, add the chopped onion, garlic, ground turkey, spices, egg, and oats.

Shape into four big patties.

Preheat the olive oil in your skillet and brown the patties before proceeding to make the mushroom gravy.


Mushroom Gravy

1 package fresh mushrooms (8-oz.) cleaned and sliced
1 tablespoon of cornstarch
1 teaspoon of mustard 
1 teaspoon of catsup
1/2 teaspoons of salt
1/4 teaspoon of black pepper
½ cups of cold water
1/2 cups of milk 
drippings in the pan


After the patties are browned on both sides, remove the patties to a plate until you make the gravy.

Stir in the cornstarch in the cold water to blend through. 

Add the mustard, catsup, salt, and pepper to the cornstarch liquid along with the sliced mushrooms.  Stir the ingredients and cook until a nice consistency.

Now add the 1/2 cup of milk to the cooked mixture.

Return the meat patties to the pan and continue cooking until thickened and the patties are thoroughly cooked.

Add more catsup or mustard according to your taste.  We like an equal balance to keep it from being too tart or too heavy on the tomato taste.  

ENJOY!

Thursday, March 29, 2018

My Best Banana Layer Cake Recipe is So Delicious, Yet Simple to Make

piece-of-banana-layer-cake.jpeg
You won't believe how easy and moist this banana cake is until you taste it yourself.


Anyone that bakes layer cakes from scratch knows that they can be more complicated to get the same beautiful results as a packaged box cake mix.  Trying to go for perfection is especially true when you don’t use cake flour for the recipe.  However, I believe where there is a will, there is a way like with this great recipe for my Best Banana Layer Cake that uses plain flour and oil instead of shortening or butter.

Those that happen to think as highly of the banana as I do definitely need to try this recipe because it is one of my best banana layer cakes.  To me, it is a winner all around for taste, the ease of preparation and staying moist–that is if your family doesn’t devour it the first day.


The Secret Behind This Light, Easy Banana Layer Cake


You may find it difficult to believe, but this cake is just as moist and light as it is easy to make without the need to cream butter or shortening with your sugar.  The reason for this is due to the extra lift of folding in stiffly beaten egg whites that you gently stir through.  Remember that you don’t want to beat.  Instead, you want to see bits of the white still intact as chunks in the batter.  


best-banana-layer-cake.jpeg
I stirred in some shredded coconut flakes in my butter cream icing instead of just sprinkling on top.

Something else that can matter for cake success is leveling off your baking powder and soda before adding it to your mixing bowl.  Use your measuring spoon and a knife to take off any extra because an excess of what you need will cause your cake problems.  

Another thing I want to mention is that you can use sour milk, buttermilk or make your sweet milk sour by adding one teaspoon of vinegar or lemon juice to it for this recipe.  Besides a perfect way to use any overly ripe bananas, this recipe is also just as handy for making this variety of cake over a chocolate cake when you have sour milk.   

Also, if you have a manual potato masher, this is wonderful for mashing the bananas over a fork.  

Top with your favorite butter cream icing and you have something delectable in a relatively short time to enjoy.  Shredded coconut flakes on top or added to the icing like I did are another option. 

The next time that you're in the mood to bake, I hope that you'll make this recipe because I promise you that you'll love it.  

Check my sidebar for some of my other banana cakes and pie recipes because I do love my bananas!


My Best Banana Layer Cake

2 large eggs, separated
1-1/3 cups of sugar
2-1/4 cups of flour
1 teaspoon of baking powder, leveled
1 teaspoon of baking soda, leveled
1 teaspoon of salt 
1/3 cup of corn oil or canola oil
1 cup of ripe, mashed bananas
2/3 cup of buttermilk or sour milk or sweet milk + 1 teaspoon of vinegar or lemon juice
1 teaspoon of vanilla extract

Preheat your oven to 350-degrees.

Grease and flour two 8-inch layer cake pans.  You can also take two sheets of wax paper and cut the rounds to insert in the bottom of each pan.  This prevents sticking and makes for easier removal as well.

Separate the yolks in one mixing bowl and the whites in another.

Beat the whites with your electric mixer with the salt until it starts to get frothy.  

Slowly add 1/3 cup of the sugar to the beaten egg whites until it is incorporated into the stiffly beaten egg whites.

Mix together the oil, mashed bananas, half of the milk, and vanilla in another mixing bowl alternating with the rest of the sugar and sifted dry ingredients.  Add the remaining milk and yolks last before gently folding in the stiff egg white mixture.

Pour into your prepared layer cake pans and bake at 350-degrees for about 30-35 minutes, depending on how your oven is regulated.

Use a cake tester, toothpick or a slender knife to test if done.

Allow the cakes to cool in the pan for about five minutes or so before attempting to remove.

Frost with your favorite vanilla butter cream icing.

ENJOY! 

Monday, March 26, 2018

Recipe: My Lemon-Marshmallow Cream Pie in My Oil Pie Crust Is Easy and Yummy

piece-of-lemon-marshmallow-cream-pie.jpeg
The texture is slightly firmer than typical lemon meringue pie due to the marshmallows and coconut flakes.


I think that I love pie even more than cakes.  A part of the reason is how much easier they are to whip up than a layer cake, especially when you have a no-fail recipe for pastry such as my oil-pie crust.  When you have a trustworthy pastry crust that you count on to turn out, then all that is left to do is to make a delicious filling like the one that I have for you today. 

My Lemon-Marshmallow Cream Pie Offers Unique Texture and Chew 


My Lemon-Marshmallow Cream Pie will remind you of a creamy, lemon meringue pie only much better since it was tweaked to perfection.  What I did was reduce the sugar and added giant sized marshmallows and grated coconut flakes that improved the texture by firming the filling up somewhat over the typical cooked pudding consistency.  The shredded coconut that I only added to the filling also contributed a different element of both sweetness and chew that was extra delicious in this pie.  

Though as delectable as this pie may be, I like to top it with a meringue or even better, some mounds of whipped topping like Cool Whip, if you have this in the house at the time.  Unlike the typical lemon meringue, this particular filling is built to withhold all that fluffy, extra goodness.


six-giant-marshmallows-for-pie.jpeg
I used six of these giant marshmallows for this lemon-marshmallow cream pie recipe. Don't you love the size?

I do have to warn you that a serving of this pie is more filling than the same size piece of lemon meringue pie.  You might want to make this pie on a day when you plan a light meal because it is richer when trying to eat the same portion.  

lemon-marshmallow-cream-pie-topped-with-meringue.jpeg
You can top with meringue like here or mounds of whipped topped like Cool Whip!


Why You Need to Try My Oil Pie Crust 


Seriously, if you never made pie crust or have problems with making one with shortening, then I really hope that you try my crust.  No joke, this is the only pie crust recipe that you will see from me on my blog because it is the best one that I ever encountered.  Don’t let the idea of a playing with what feels like a greasy, oil dough ball scare you off.  Otherwise, you will be missing one of the flakiest, easiest and a healthier corn oil or canola oil crust than one made with shortening or plain vegetable oil. 

Another advantage of using my oil pie crust recipe is that it will save you money.  The  pre-made crusts in the freezer section cost significantly more than the few ingredients of oil, salt, milk, and flour that go into this one.  They also have preservatives, less than healthy artery-clogging oil and are stuffed with other chemicals.  The only thing in their favor is your kitchen and hands don’t get messy.  Unless that is more important to you, then by all means buy your prepackaged pie crusts.  I refuse to eat them.

Furthermore, I use my oil pie crust recipe for everything that calls for a pasty crust from quiche, pot pie to a dessert.  This recipe never once disappointed me, my family or guests in all the times that I made it.  In fact, you might want to keep an index card on your refrigerator with a magnet like I do for all its varied uses. 


three-pieces-of lemon-marshmallow-cream-pie-in-oil-pie-crust.jpeg
Eat a light meal before attempting to eat pieces of this size or serve them smaller.


My Lemon-Marshmallow Cream Pie


10-inch pre-baked pie crust (my oil pie crust)
1-1/4 cups of sugar + 2 tablespoons of sugar
½ cups of cornstarch
6 extra large, cut marshmallows about (12 regular size)
2 cups of cold water
4 egg yolks
2/3 cups of lemon juice
1 teaspoon of vanilla extract
1/3 cup of grated coconut flakes


Meringue Topping:


4 egg whites for meringue
1/4 teaspoon of salt (for meringue)
4 tablespoons of sugar (for meringue)
1 teaspoon of vanilla extract


To Prepare the Filling:


Take out your eggs and leave at room temperature before attempting to separate them for yolks and whites.  

Here’s a trick that I do when I want to speed the process along.  Run some warm water over the eggs first will help before cracking so the yolks separate more easily.

In the pot that I plan to cook the filling, I add the yolks, cornstarch, water, lemon juice and the sugar.  Mix this on medium heat.

Cook the filling mixture until it starts to thicken, stir occasionally to keep it from burning. 

Once it starts bubbling, add the cut marshmallows and melt mostly through.  

Take off the heat, then stir in the vanilla and coconut flakes.

To Make the Meringue:

In another mixing bowl, add the whites with the 1/4 teaspoon of salt and beat with your electric mixer until it becomes frothy.  

Slowly, add a little of sugar at a time to the whites while you continue beating until stiff peaks form and all the tablespoons of sugar are incorporated into the meringue.  

Add the vanilla last.

Pour into your prebaked pie crust.

Top with the meringue and bake in a 350-degree oven for about 12-15 minutes or so, depending on how your oven is regulated.  You want the meringue to slightly brown.  Therefore, keep an eye on it because you don’t want it to get too dark.  

Cool thoroughly before serving.

ENJOY!

Sunday, March 18, 2018

My Cake Like Oatmeal Drop Cookies Recipe Will Spoil You


cake-like-oatmeal-drop-cookies.jpeg
These puffy delights of oatmeal and coconut are soft, but chewy.


Yesterday, I needed something to punch so I turned to bread making and took my anger out onto a poor wad of dough.  Trust me, vigorously kneading and beating bread is very therapeutic when you need some kind of release for negative emotions.  The dough didn’t feel a thing, but I as you surely might guess did feel better by the time I shaped those breads into their loaf pans.


plate of cake-like-oatmeal-cookies.jpeg
You can make them as big or as small as you like, but give them space to grow.  

On second thought, a punching bag is not a bad idea if you have the room for it in your home for working out stress.  In fact, I think I would like to have one that you could use for kick boxing for an extra workout.   Think of all the calories that you burn and muscles that you use attacking that bouncing bag as you strike those blows and kicks to its synthetic middle as it hangs at your mercy from the ceiling.  Since I would never have the space for such a thing or one of those big vinyl bags that the kids play with, I will stick getting physical with dough instead.


Though as delicious as my Oatmeal Bread turned to be, I missed baking a weekend treat.  Therefore, I decided to make this recipe because I needed my weekly sweet.  After carefully going through my assortment of recipe boxes, I finally narrowed my choice to my Cake Like Oatmeal Drop Cookie.


cake-like-texture-of-oatmeal-cookies.jpeg
These cookies have a tender, cake-like texture.


As you may have gathered by now, I also hate complicated recipes that are more trouble than they are worth.  What I’m sharing here is easy and will not require long creaming any hard butter or shortening with your sugar.  I saved you a step by using oil, which is also healthier, especially if you use the corn oil.   It also simplifies steps for easier incorporating of the ingredients into this recipe.  

My Cake Like Oatmeal Drop Cookies are puffy nuggets with just enough shredded coconut to make them addictive once you start eating.  They are soft, but chewy and will go great with coffee or a glass of milk.

I hope the next time that you decide to bake some cookies that you’ll want to these oatmeal cookies because they are really good.  If you also love oatmeal cookies, you can find more of my recipes such as Chewy Oatmeal Delights, my convenient oatmeal cookie mix, my favorite oatmeal coconut cookies, which is rammed with lots more coconut, to my oatmeal banana cookies to my spicy oatmeal drop cookies.


My Cake Like Oatmeal Drop Cookies


5-1/2 cups of sifted flour
1 cup of sugar
1 cup of firmly packed brown sugar (light or dark)
1 cup of corn oil
2 cups of oatmeal (quick or old-fashioned)
1 teaspoon of salt
2 teaspoons of baking powder, leveled
3 large eggs
1 cup of milk
1 teaspoon of baking soda, leveled
1 tablespoon of vanilla extract
2/3 cups of grated coconut
1 teaspoon of lemon juice or white vinegar


Mix the oil with the sugars and eggs until creamy.  

Dissolve the soda the milk that you added the vinegar or lemon too.

Sift the rest of the dry ingredients and slowly alternate with the milk mixture and vanilla into your mixing bowl that has the sugars and eggs.  Beat with your electric mixer or a whisk until the ingredients are well combined.

Drop by tablespoons onto greased cookie sheets. 

Bake in a 350-degree oven for about 10-12 minutes, depending on how your oven is regulated.  Test with a toothpick, slender knife or a cake tester to see if anything sticks.

ENJOY!

Saturday, March 17, 2018

Make My Favorite Oatmeal Bread Recipe, a Tasty and Great Way to Relieve Stress

favorite-oatmeal-bread.jpeg
Baking my Oatmeal Bread is easy, tasty and a method to relieve stress.


I always make my own yeast breads.  Besides how much better homemade bread tastes over spongy, packaged commercial bread, I found bread-making is a great stress reliever when you’re infuriated over something.  

The Advantages of Baking Homemade Bread Than Buying


Pliable dough makes a wonderful punching bag to redirect pent-up anger and channel it for good because the longer the bread is worked, the better the bread.  Therefore, I highly recommend picking up a bag of yeast, which is cheaper than the little packets and flour to keep on hand when life doesn’t go according to plan despite your best efforts.

Another reason that I love homemade bread is because I can’t see paying some of the high prices I see for what I can make basically for pennies.  Making your own yeast bread is also more filling than the spongy variety that feels like you are eating more air than a bread slice.  

Most important, homemade bread is much better and simply delicious than some pathetic loaf left stuffed, over browned or underdone.  The taste will spoil you once you bake your own.

sliced-oatmeal-bread.jpeg
Taking your frustrations out on your dough turns out better bread!


Why I Prefer to Avoid Buying Bread


Of course, you can buy the loaves from the bakery end.   The bakery loaves are even higher than the spongy loaves, but the real problem is selling bread in opened bags.  When you see the breads exposed from within a paper bag think how many hands may have touched it.  Then again, imagine a typical store where customers and employees can randomly cough or sneeze in the vicinity of that bread where all those airborne germs can find their way to contaminate what you may want to consider putting into your mouth. 

If that thought is not sickening to your stomach enough, then think about the warm weather that will hopefully be here soon.  Flies do seem to often find their way inside grocery stores during the summer and where they might land is anyone’s guess.  However, I must say that an unsealed bag of fresh bread is a waiting invitation to flies and other disgusting insects. 

The recipe that I have for you today is really different.  Imagine the taste of a whole wheat bread with a slightly sweet nutty flavor is the best way to describe this bread.  My Favorite Oatmeal Bread is a wonderful source of fiber with added protein to plain white bread.  Due to the oatmeal it also brings to this recipe manganese, molybdemum, phosphorus, copper, biotin, Vitamin B1, magnesium, chromium, zinc and protein, which is good for health.  When you make your own bread, you know exactly what you are eating instead of a giant list of chemical preservatives and other questionable ingredients.

Baking Yeast Bread Is Easy 


Making this recipe is easier than you may think.  Basically, you’re going to boil some water first to pour over your oatmeal to make it a bit mushy.  At the same time, you’re going to give your yeast a head start in some hotter than warm water with some sugar for it to feed on.  Introducing the sugar this way tempts that yeast to grow faster and helps it bubble, signaling it’s proofed faster.  Once that’s accomplished, the rest of this recipe is just combining, mixing, punching and shaping.  

My recipe is exceptionally delicious to make peanut butter sandwiches.  I don’t why but I am on a peanut butter kick lately.

I hope that you won’t need to bake my recipe because you also need something to take your anger out on, but just to enjoy the taste of my bread.


My Favorite Oatmeal Bread

2 cups of boiling water
1 cup of oatmeal (any variety)
1 tablespoon of dry yeast (1 package)
1/4 cup of hotter than warm water (test on your inner wrist like you would for a baby’s formula)
1 tablespoon of flour
1 teaspoon of sugar
1 teaspoon of salt
2 tablespoons of corn or canola oil
1/4 cup of sugar
5-6 cups of sifted white flour


Dissolve the yeast in the warm water with the one teaspoon of sugar and the one tablespoon of flour.  Mix and set aside until the mixture starts to bubble.

In the meantime, pour the boiling water over the oatmeal.  Stir it and allow it to cool to lukewarm before adding the salt, the proofed yeast mixture, oil, and sugar.  Mix with your wooden spoon to combine the ingredients in your mixing bowl.

Stir in the flour gradually, mixing until you get a dough that is ready to be handled.  If it is too sticky, add slightly a bit more flour.  Your goal is soft, but pliable dough.  Too stiff dough will not turn out a good loaf.

Once you get that nice tender dough, you flour your surface and knead it there or in a large mixing bowl.  I knead mine in a giant mixing bowl to save cleaning steps because I have to wash that anyway.

When you finish taking your frustration out on that poor dough ball, then stick the dough in a greased bowl, cover with a dish towel and place in a warm spot until double in bulk.  This should take about an hour.

After the dough doubles in size, punch it again.  Cover again and let it continue to grow in the warm place for about another hour.

Grease two loaves or three small loaf pans. 

Divide the dough and shape to fit those pans.

Bake in a 350-degree oven for about 30 minutes, depending on how your oven is regulated. 

ENJOY!

Saturday, March 10, 2018

You Got to Try My Best Ever Banana Bread Recipe

best-ever-banana-breads.jpeg
This banana bread recipe is more cake like than bread like.


I buy a lot of bananas because we really love them at my house. Did you know that if you buy a few bunches at a time that cashiers tend to ask if you have a monkey?  I always get a chuckle out of that but I just have a wild gang that does need their banana fix.

Bananas are delicious and transport well in their own case for when packing lunches.  They also happen to be full of nutrients mainly lots of B6 and B12, magnesium and potassium with some added fiber.  It also makes a great low calorie snack at around 105 calories for when you need something sweet.  

Today, I want to share another one of my top favorite banana bread recipes.  You get four small breads that are moist and not as dense as some typical banana breads.  Instead, my recipe is more cake like, but on the order of a pound cake with a finer crumb texture. 

My Best Ever Banana Bread

½ cups of corn oil
2-1/2 cups of sugar
3 large eggs
3 ripe bananas, mashed 
3 cups of sifted flour
1 teaspoon of baking soda, leveled
1 cup of milk
1 teaspoon of white vinegar or lemon juice
½ teaspoons of salt
2 teaspoons of vanilla extract
2 teaspoons of baking powder, leveled


Beat your oil with the sugar before mixing in the eggs and vanilla, one at a time in your mixing bowl.  

Add the mashed bananas to the mixing bowl and incorporate with your electric mixer.

Mix the white vinegar in with the milk along with the baking soda to dissolve.

Sift together the flour, salt and baking power.

Alternate the milk mixture and dry mixture into your mixing bowl with the creamed ingredients until everything is well combined.

Pour into four well-greased smaller loaf pans.

Bake in a 350-degree oven for about 50 minutes, depending on how your oven is regulated.

Test with a cake tester, slender knife or toothpick to see if anything sticks.

ENJOY!

Saturday, December 23, 2017

Recipe: My Special Sugar Cookies Are Always a Holiday Hit

sugar-cookies-on-plate.jpeg
One taste will convince you that these are special sugar cookies that stand out from the norm.


Just in case that you’re still baking holiday cookies, I wanted to share another favorite of mine.  My Special Sugar Cookies recipe is a buttery delight that is rolled and cut into shapes and finished with a light sprinkling of colored sugar, sprinkles or jimmies (whichever term that you prefer) to decorate. 

Depending on how thick you roll out the dough, you can change the texture of the cookie.  The thinner the dough, the crisper the cookie that you’ll make. Thicker dough will produce a softer texture of this cookie.

Feel free to recruit your little helpers when you make these cookies.  Kids love picking out the cookie cutter shapes and assisting with decorating these, probably as much as they enjoy eating them!


My Special Sugar Cookies


sugar-cookies-in-container.jpeg
This recipe makes a lot more than what's shown.

1-1/2 cups of sugar
1 cup of butter, softened
1/4 cup of milk
1 large egg
1-1/2 teaspoons of vanilla                
3 cups of flour
1 teaspoon of baking powder, leveled                 
1/4 teaspoon of salt
colored sugar, sprinkles or jimmies


Use your electric mixer to cream the softened butter with the sugar thoroughly until light and fluffy.

Beat in the egg and vanilla.

Sift together the flour, baking powder and salt in another mixing bowl.

Now slowly stir in some of the milk and alternate with the dry ingredients to the creamed mixture.  Keep adding until you combine all the dry ingredients.

What I do is to divide the dough into three balls.  The waiting dough goes under my mixing bowl while I roll out the first ball on a floured surface.

Usually, the thickness I go with is about 3/8-inch.  Add more flour to your table or surface if the dough gives you problems and sticks when you use your rolling pin.  

Shape with favorite cookie cutters, glass or even a clean lid from 40-oz. peanut jar works.  All you have to do is improvise to make use of what you have.

Place your shaped cookies on well-greased cookie sheets before decorating with your colored sugar, sprinkles or jimmies before placing in a 350-degree oven for about 12-15 minutes, depending on how your oven is regulated and the thickness of your cookies.  (Thinner cookies need less time, probably about 7 minutes).  

Be sure to check the edges because you don’t want them to brown.  Make sure to see just a slight golden brown starting to color them from the bottom.  Test with a toothpick to see if anything sticks.

These cookies will be soft when you initially remove them from the oven.  Give them about a minute or two to set in the pan before attempting to remove them.

ENJOY!