Showing posts with label oil pie crust. Show all posts

Monday, March 26, 2018

Recipe: My Lemon-Marshmallow Cream Pie in My Oil Pie Crust Is Easy and Yummy

piece-of-lemon-marshmallow-cream-pie.jpeg
The texture is slightly firmer than typical lemon meringue pie due to the marshmallows and coconut flakes.


I think that I love pie even more than cakes.  A part of the reason is how much easier they are to whip up than a layer cake, especially when you have a no-fail recipe for pastry such as my oil-pie crust.  When you have a trustworthy pastry crust that you count on to turn out, then all that is left to do is to make a delicious filling like the one that I have for you today. 

My Lemon-Marshmallow Cream Pie Offers Unique Texture and Chew 


My Lemon-Marshmallow Cream Pie will remind you of a creamy, lemon meringue pie only much better since it was tweaked to perfection.  What I did was reduce the sugar and added giant sized marshmallows and grated coconut flakes that improved the texture by firming the filling up somewhat over the typical cooked pudding consistency.  The shredded coconut that I only added to the filling also contributed a different element of both sweetness and chew that was extra delicious in this pie.  

Though as delectable as this pie may be, I like to top it with a meringue or even better, some mounds of whipped topping like Cool Whip, if you have this in the house at the time.  Unlike the typical lemon meringue, this particular filling is built to withhold all that fluffy, extra goodness.


six-giant-marshmallows-for-pie.jpeg
I used six of these giant marshmallows for this lemon-marshmallow cream pie recipe. Don't you love the size?

I do have to warn you that a serving of this pie is more filling than the same size piece of lemon meringue pie.  You might want to make this pie on a day when you plan a light meal because it is richer when trying to eat the same portion.  

lemon-marshmallow-cream-pie-topped-with-meringue.jpeg
You can top with meringue like here or mounds of whipped topped like Cool Whip!


Why You Need to Try My Oil Pie Crust 


Seriously, if you never made pie crust or have problems with making one with shortening, then I really hope that you try my crust.  No joke, this is the only pie crust recipe that you will see from me on my blog because it is the best one that I ever encountered.  Don’t let the idea of a playing with what feels like a greasy, oil dough ball scare you off.  Otherwise, you will be missing one of the flakiest, easiest and a healthier corn oil or canola oil crust than one made with shortening or plain vegetable oil. 

Another advantage of using my oil pie crust recipe is that it will save you money.  The  pre-made crusts in the freezer section cost significantly more than the few ingredients of oil, salt, milk, and flour that go into this one.  They also have preservatives, less than healthy artery-clogging oil and are stuffed with other chemicals.  The only thing in their favor is your kitchen and hands don’t get messy.  Unless that is more important to you, then by all means buy your prepackaged pie crusts.  I refuse to eat them.

Furthermore, I use my oil pie crust recipe for everything that calls for a pasty crust from quiche, pot pie to a dessert.  This recipe never once disappointed me, my family or guests in all the times that I made it.  In fact, you might want to keep an index card on your refrigerator with a magnet like I do for all its varied uses. 


three-pieces-of lemon-marshmallow-cream-pie-in-oil-pie-crust.jpeg
Eat a light meal before attempting to eat pieces of this size or serve them smaller.


My Lemon-Marshmallow Cream Pie


10-inch pre-baked pie crust (my oil pie crust)
1-1/4 cups of sugar + 2 tablespoons of sugar
½ cups of cornstarch
6 extra large, cut marshmallows about (12 regular size)
2 cups of cold water
4 egg yolks
2/3 cups of lemon juice
1 teaspoon of vanilla extract
1/3 cup of grated coconut flakes


Meringue Topping:


4 egg whites for meringue
1/4 teaspoon of salt (for meringue)
4 tablespoons of sugar (for meringue)
1 teaspoon of vanilla extract


To Prepare the Filling:


Take out your eggs and leave at room temperature before attempting to separate them for yolks and whites.  

Here’s a trick that I do when I want to speed the process along.  Run some warm water over the eggs first will help before cracking so the yolks separate more easily.

In the pot that I plan to cook the filling, I add the yolks, cornstarch, water, lemon juice and the sugar.  Mix this on medium heat.

Cook the filling mixture until it starts to thicken, stir occasionally to keep it from burning. 

Once it starts bubbling, add the cut marshmallows and melt mostly through.  

Take off the heat, then stir in the vanilla and coconut flakes.

To Make the Meringue:

In another mixing bowl, add the whites with the 1/4 teaspoon of salt and beat with your electric mixer until it becomes frothy.  

Slowly, add a little of sugar at a time to the whites while you continue beating until stiff peaks form and all the tablespoons of sugar are incorporated into the meringue.  

Add the vanilla last.

Pour into your prebaked pie crust.

Top with the meringue and bake in a 350-degree oven for about 12-15 minutes or so, depending on how your oven is regulated.  You want the meringue to slightly brown.  Therefore, keep an eye on it because you don’t want it to get too dark.  

Cool thoroughly before serving.

ENJOY!

Saturday, April 22, 2017

Recipe: My Choco-Peanut Butter Banana Cream Pie Offers a Unique Marriage of Flavors That Is Out-of-This World Delicious!


Choco-Peanut Butter Banana Cream pie.jpeg
This pie is a one way to enjoy so many awesome flavors.


Did you ever have one of those days when you’re craving a few different things at the same time when you’re about to bake and couldn’t decide?  Well, I was in the mood for something chocolate.  Then, I thought a peanut butter goodie would be great until I looked over to my fruit bowl with bananas that were getting overly ripe.  Therefore, I thought why not invent something using all delicious ingredients into a cream pie? The result was today’s recipe.

Saturday, August 20, 2016

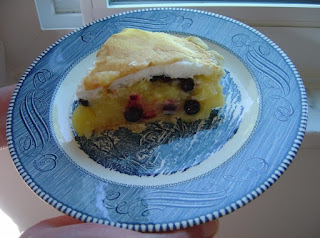
Recipe: Treat Yourself to My Decadent Lemon-Blueberry Coconut Meringue Pie!


piece of Decadent Lemon-Blueberry Coconut Meringue Pie.jpeg
My Decadent Lemon-Blueberry Coconut Meringue Pie is a delicious marriage of flavors!


Though I am trying to stay away from sugar and have been good for so many weeks, I was craving something sinfully sweet.  Yet, not just anything would do.  What I wanted was creamy, but different.  The recipe that I have for you today has the luscious goodness of fresh lemons along with the added flavors of summer’s bounty of fresh blueberries and tropical coconut flakes for a sensational twist to a traditional lemon pie before being topped with a cloud of meringue. 

Sunday, June 7, 2015

Recipe: My Unbelievably Easy and Delicious Mock Pecan Pie that You MUST Try!


a piece of my Mock Pecan Pie.jpeg
A scoop of vanilla ice cream makes this  pie extra delicious! 


If you love the taste of pecan pie, but can’t enjoy it because of nut allergies or the current lack of pecans in your pantry, then you are going to treasure the recipe that I have for you today with my Mock Pecan Pie

My recipe is not only completely free of nuts, but it uses oatmeal, coconut, and some Karo corn syrup among its ingredients to replicate this amazing flavor.  This pie also is so simple to make, especially if you use my oil pie crust

I promise you that if you never made a crust before, then my oil pie crust recipe will turn out and surprise you. Traditional pastry dough can take a knack and lots of shortening or lard to get a flaky, tender crust. However, this crust does too, only it will form an oily ball.  Don’t be alarmed that you must have done something wrong because this is normal.  

The next time that you're in the mood for pie, I hope that you print out this recipe because you will really love it. 

My Mock Pecan Pie

3/4 cup of sugar
1 stick of melted butter
2 large eggs
2/3 cup of light Karo corn syrup 
1/4 cup of molasses (dark or light) 
1/4 teaspoon of salt
2 teaspoons of vanilla extract
1 cup of rolled oats, quick
½ cup of coconut flakes


Make my oil pie crust first.   For this recipe, you will need to divide that ball and press it in two (eight-inch) pie pans that are well-greased. 

To make the filling: 

Mix the sugar, melted butter, and eggs in your mixing bowl.  Beat with your electric mixer to get it creamy.

Add your Karo syrup, molasses, salt, and vanilla next and mix again.  (If you have the dark Karo, go for it and take out the molasses because this works as well.)  

Finally, add the oatmeal and coconut flakes and give it a final mixing.

Pour into two unbaked pie shells and bake in a 350-degree oven for about 45 minutes or until it becomes golden brown and doesn’t overly stick when inserting a slender knife or tooth pick in the center.

Serve it with some whipped cream or vanilla ice cream as I plan on indulging this way today.

ENJOY!


My Mock Pecan Pie frontview.jpeg
You will get TWO (eight-inch) pies to enjoy.

Sunday, July 20, 2014

Recipe: My Apple Cream Pie Is a Deliciously Different Treat That You Need to Try!

Today, I have a wonderful recipe that I want to share with you for my Apple Cream Pie. Unlike a traditional apple pie that is brimming with apples and spices, this tasty version has an unusual ingredient of sour cream added to the mix along with a pastry-like crumb topping instead of a normal top crust.

You’ll find that the sour cream gives those apples and spices a luscious texture and such delectable flavor that you’ll fail to understand why you never tried sour cream before with your fruit pies.

As always, I do hope that you will use my oil-pie crust for this recipe.  Honestly, it is foolproof despite the oily ball you will form. It is the easiest, flakiest, and simply the best pastry recipe that you will ever want for dessert crusts, pot pies, or even quiche.

My Apple Cream Pie

one 9" pie crust or one recipe of my oil-pie crust
1 cup of sour cream
2 tablespoons of flour
3/4 cup of sugar
1/4 teaspoon of salt
1-1/2 teaspoons of vanilla extract
1 large egg
3 cups of diced tart apples
½ teaspoon of ground cinnamon
1/4 teaspoon of ground nutmeg

Topping:

1/3 cup of flour
½ cup of firmly packed brown sugar (light or dark)
1/4 teaspoon of ground cinnamon
1/4 cup of butter

Mix the sour cream, flour, sugar, cinnamon, nutmeg, salt together first and then add the egg and vanilla and combine thoroughly.

Stir in the apples to the mixture next and mix through.


Pour the ingredients into the pie crust and bake in a 400-degree oven for about 25 minutes.

While the pie is baking, prepare the topping as you would a shortening type pastry by rolling the ingredients together with your hands to form large crumbs.  

When you take the pie out, sprinkle the topping mixture over it and return to the oven and continue baking for about 15 more minutes.


ENJOY!

Saturday, June 28, 2014

You’ll Crave My Creamy Caramel Pie Recipe Once You Dig in!

caramel-pie.jpeg
This pie tastes like liquid caramel candy in a creamy filling topped with a cloud of meringue.


When I didn’t share a recipe last week, I kept getting emails from disappointed readers so I do apologize. Therefore, I thought pie was in order. This is not just any pie, but something that tastes like liquid caramel candy only in a luscious, creamy form of pie that is crowned with fluffy meringue.  Served cold, my Creamy Caramel Pie will delight the family and guests.

As I always mention, I love good food but hate complicated recipes.  The hardest part of preparing this pie is cooking the filling.  I recommend trying my oil-pie crust because it is simple and foolproof even if you never baked a pie crust before.  

On the other hand, pie crust recipes that use shortening can be tricky. If you handle the dough too much, your crust can become tough and hard.  I have built my share of those. However, my oil-pie crust recipe turns out flaky every time regardless of what you do to it. This I promise you.

Here’s a tip that I want to pass along about separating eggs. Sometimes, you may forget leaving them at room temperature for a bit to improve your chances of separating them successfully.  When you’re rushed, try running them under hot water for a few seconds to warm the eggs up first. This helps separate them with greater success than fresh out of the refrigerator.


My Creamy Caramel Pie

1 cup of firmly packed brown sugar (light or dark)
1/4 cup of melted margarine (not spread) or butter
3 large eggs, separated
2 tablespoons of flour
2 tablespoons of cornstarch
2-1/2 cups of evaporated milk
1 baked 9-inch pie shell
1 teaspoon of vanilla extract

Meringue Topping:

6 tablespoons of sugar
1/4 teaspoon of salt
3 large egg whites
½ vanilla extract


To Prepare the Caramel Filling:

Cook the brown sugar and your butter together in a heavy pot like a cast iron skillet until it caramelizes.

Mix the egg yolks, flour, and cornstarch and gradually stir in a little of the milk to it in a mixing bowl.

Add the rest of the milk and thoroughly mix.

Now pour the milk mixture slowly into the caramelized sugar-butter and continue cooking, stirring constantly until thickened.

Pour into your baked pie shell.


To Prepare the Meringue:

Take out your electric mixer and beat the salt with the egg whites until it becomes frothy.

Gradually add the sugar and continue beating until stiff peaks form.  If you add the sugar too quickly, the meringue will fall and become limp instead of stiffening up.

Be care to spread the meringue all over to the edges of your pie to seal the filling in. 

Bake in a 350-degree oven for about 8-10 minutes until slightly browned.

Chill before serving.

ENJOY!

Saturday, March 1, 2014

Recipe: Significant Snow Is Coming So It's an Ideal Time to Try My Easy Applesauce-Custard Pie!

Today, I have one of the simplest and most incredibly delicious pies that you can ever make. Even if you never baked a pie before, this recipe for my Applesauce-Custard Pie is foolproof especially if you use my oil pie crust! This pie has applesauce kicking up the flavor scale with cinnamon and cloves in an egg base evaporated milk custard for extra velvety creaminess.

Here's something else that you will like to cut down on washing more measuring cups. Don't throw your emptied evaporated milk can away because it is a convenient measure for the water this recipe also needs.

Of course, you can use a frozen pastry shell that you buy. However, I doubt you will want to again once you see how easy and flaky my oil pie crust turns out. You will save money and your health by using oil instead of artery-clogging shortening.

You will be pouring this filling into a raw pastry shell and then baking.  The hardest part of this recipe is the waiting for this scrumptious pie to bake! Trust me, but you know what I mean as the aroma of the applesauce and spices escape from your oven.

My Applesauce-Custard Pie

2 large eggs, beaten
1 cup of sugar
1/2 can of evaporated milk (the 12-oz. size can)
12 oz. of water (use the evaporated milk can to measure)
1/2 teaspoon ground cinnamon
1/4 teaspoon ground cloves
1 teaspoon vanilla
12 oz. of apple sauce

Make or unthaw your favorite pie crust and place it in your greased pie pan.

Pour in your filling mixture and then bake in a 325-degree oven for about 1-1/2 hours, depending on how your oven is regulated.

Test with a slender knife to see if anything sticks to see if it is done.


ENJOY!

Saturday, January 4, 2014

My Amazing Bourbon Pecan Pie Can Cheer You Back Up As Those Holiday Bills Arrive

The holidays were full of cheer.  However, now the fun part begins when the credit card bills start to arrive.  Instead of letting those amounts  depress you, you might want to make this recipe.  Though my bourbon pecan pie can't repair the damage, it does use dark chocolate to help uplift that mood in a scrumptious toasted pecan base that can definitely put a smile back on your face.  Accented with just a bit of bourbon and a faint kiss of cinnamon, this is a simple and supremely delicious pie that the aroma alone can miraculously cheer a person up.

I hate complicated recipes.  Therefore, you need not worry here because this is just assembling ingredients and pouring into an unbaked pie crust.  

If you read me regularly, you know that I only use one recipe for pie crust, my oil pie crust.  Honestly, it is the easiest pastry crust on the planet to make that is foolproof and turns out flaky every time, despite what you do to it. 

I hope you try this pie sometime because it is a keeper as well as a real crowd-pleaser!

My Amazing Bourbon Pecan Pie

1 cup of firmly packed brown sugar (light or dark)
3/4 cup of light corn syrup
3 large eggs, lightly beaten
1/2 cup of dark chocolate chips or grate a dark chocolate bar
1/2 cup of chopped toasted pecans
1/4 cup of melted butter or margarine (not spread)
2-1/2 tablespoons of bourbon
2 teaspoons of vanilla extract
1/4 teaspoon of ground cinnamon
1/4 teaspoon of salt

Preheat your oven to 375-degrees.

Then prepare a nine-inch pie crust.

Combine all the ingredients together in your mixing bowl thoroughly till well blended.

Pour into that unbaked pie crust and bake for about 40-50 minutes until golden and the filling is set.

You need to cool this pie for about two hours before cutting.

ENJOY!

Saturday, December 14, 2013

Brighten Holiday Spirits With My Special Chocolate-Peppermint Mallow Pie!


Chocolate-Peppermint Mallow Pie.jpeg
Delicious Chocolate-Peppermint Mallow Pie!


Baking something sensational to serve your family and friends for the holidays is easier when you have a really great recipe at your fingertips like my Special Chocolate-Peppermint Mallow Pie.  Imagine cooked chocolate-pudding like filling with mini marshmallows and shredded coconut melting through that velvety mix spiked with peppermint extract and bourbon vanilla to play off that dark deliciousness.  The taste is a decadent chocolate indulgence that you won't be able to resist once you get your first bite.

You simply pour this cooked filling into a prebaked pie shell and will later cover and chill it in the refrigerator.  Please use my oil pie crust recipe if you haven't tried it yet.  No joke, readers, this is the ultimate foolproof pie crust recipe that you will ever come across. 

Even if you never baked a pie before, your crust will turn out flaky with this simple recipe that I am sharing with you.  You have my word on it.  Trust me, but you won't see another pie crust recipe on Nuts 4 Stuff because this is the only one I make these days for any dessert pies, pot pies, quiches, or tarts.

If I already made your mouth water, then I do apologize.  However, I hope when you start your holiday baking that you will remember my recipe and give it a try. 


piece of Chocolate-Peppermint Mallow Pie.jpeg
Here is a piece of my Chocolate-Peppermint Mallow Pie.


My Special Chocolate-Peppermint Mallow Pie

2/3 cup of sugar
4 tablespoons of cornstarch
5 tablespoons of unsweetened cocoa
4 large egg yolks
3 cups of evaporated milk
1 cup of mini marshmallows
1 cup of shredded coconut (reserve about 1/4 cup to sprinkle on top)
1 teaspoon of Nielsen-Massey Vanillas Pure Peppermint Extract
1 teaspoon of Nielsen-Massey Vanillas Bourbon Vanilla Extract

Mix  the cornstarch, cocoa and sugar in your pan. 

Add the egg yolks to the milk and whisk together before pouring into the dry ingredients in your saucepan.

Heat the mixture until it thickens to a boil, stirring constantly.

Take off of the heat and stir in the marshmallows, coconut, and extracts before pouring into your baked pie shell.  

Use the reserved coconut to sprinkle on top.

Cover and refrigerate.

ENJOY!
Chocolate-Peppermint Mallow Pie front view.jpeg
Chocolate-Peppermint Mallow Pie


Saturday, June 22, 2013

Recipe: My Chilled Lime Cloud Pie Will Cool You Off When Temperatures Soar!


Now that summer is finally here, I thought you might like to keep this delicious recipe for my Chilled Lime Cloud pie within reach.  This is a very unusual pie that has applesauce, lime gelatin, sugar, lime juice, and rind that are eventually combined with whipped, chilled evaporated milk to turn it into a light lime cloud texture when poured into your baked pie shell.

For a wonderful change of flavor, I suggest switching the lime and replacing with lemon gelatin, lemon juice and lemon rind.  Orange gelatin, orange juice, and orange rind makes a yummy orange version.

The most difficult thing about this recipe is remembering to take out your evaporated milk chilling in the freezer before it hardens.  Other than assembling and whipping that milk, this filling requires very little preparation.

You can stick this filling in a graham cracker crust or put in a regular baked pie shell.  I strongly recommend trying my no-fail oil pie crust recipe.  Readers, this is the best out there and always turns out flaky even for beginners.  It's also healthier than typical store-bought shells. 

I hope you try my pie and definitely give my oil pie crust a shot! 

My Chilled Lime Cloud Pie

2-1/2 cups of applesauce
1 cup of sugar
1 small package (3-oz.) of lime gelatin
2 tablespoons of lime juice
1/4 teaspoon of lime rind
1 can evaporated milk (13-oz.), chilled
1 baked 9-inch pie crust

Take your measured applesauce and heat in a saucepan. 

Stir in the gelatin next.

Add the sugar, lime juice and rind.

Whip the chilled evaporated milk with your electric mixer until thickened.  

Then fold into the heated applesauce-gelatin mixture.

Spoon into the baked shell and chill thoroughly before serving.

ENJOY!

Saturday, May 25, 2013

Recipe: Impress Your Guests and Serve My Spectacular Walnut-Chip Pie!


My Spectacular Walnut-Chip Pie is a high calorie indulgence that gets you racing to sample it.  Imagine a rich pecan pie (only you will be using walnuts) with added awesomeness of semi-sweet chocolate chips and further complimented with vanilla and bourbon or rum extracts to turn it beyond extraordinary.  

If this is sounding divine, then you are right.  This pie never lags behind when it comes to cleaning plates or begging for the recipe.  Therefore, I hope you try this recipe sometime.

Readers, please do make my fail-proof oil pie crust.  Honestly, this is the only crust I make now because it is the best ever. 

My Spectacular Walnut-Chip Pie

3/4 cup of firmly packed brown sugar, light or dark
1/4 cup of sugar
3/4 cup of light corn syrup
1 tablespoon of molasses (light or dark)
3 large eggs, lightly beaten
1/2 cup of semi-sweet chocolate chips
1/2 cup of chopped toasted walnuts
1/4 cup of melted butter or margarine (not spread)
2 teaspoons of bourbon or rum extract
1 teaspoon of vanilla extract
whipped cream, optional
unbaked 9-inch pie shell

Make your pie crust and fit it into your greased 9-inch pie pan. 

Mix all the remaining ingredients into your mixing bowl until well combined.  Pour into your unbaked shell.

Bake in a 375-degree oven for about 40-50 minutes or until you see a golden crust.  Insert a thin knife to see if the filling is set.

Cool for at least two hours first before attempting to cut.  Otherwise, your pie will ooze.

Top with a dollop of whipped cream is optional, but sinfully delicious.

ENJOY!

Sunday, May 5, 2013

My Scrumptious Homemade Strawberry Pie Is a Sure Winner!


Now is the perfect time to take advantage of strawberries since this is currently the season for them.  One of my favorite ways to enjoy these tasty berries is to make this easy strawberry pie recipe that I want to share with you today.

This pie involves thickening the base with a little cornstarch and water along with your sugar before adding some strawberry gelatin and vanilla extract that will soon be poured over your baked pie shell lined with fresh, sliced strawberries.  Do save a few of the bigger berries for the top of the pie.  Next, you fill the pie with that mixture before refrigerating.  

Once cold, you top the pie with whipped cream for a scrumptious seasonal pie bursting with that sweet, but tart awesomeness of strawberries!

Feel free to add a few drops of red coloring to the base mixture to pretty it up for guests, but I usually skip that since I like to avoid unnecessary food additives like dyes of any sort to my food.

To make life even simpler and healthier, I strongly recommend making my oil pie crust.  Honestly, I will not give you any other pie crust recipe than this one because it is the best in my opinion.  No matter how inexperienced a pie maker you are or how you handle this greasier feeling dough, it will turn out flaky and never disappoint you.  

Equally wonderful about my crust is that you use this recipe for pot pie crust, quiche, or just any dessert pie crust as well.

My Scrumptious Strawberry Pie

1 cup of sugar
2 heaping tablespoons of cornstarch
1 cup of cold water
1/2 of a small size package of a strawberry gelatin (3-oz. size) or 1/4 cup of a strawberry gelatin from the larger size
1 teaspoon of vanilla extract
3 drops of red coloring (optional)
1 quart of fresh strawberries, washed and hulled
1 9-inch pie shell, baked and cooled
whipped cream

Mix the sugar, cornstarch and color water in your saucepan.

Cook the mixture slowly, stirring until thick and clear.

Remove from the heat and add your gelatin powder, vanilla, and food coloring (if desired).

Slice most of your strawberries to line the bottom of baked crust.

Save a few of the large strawberries to decorate the top .

All that if left to do is pour the cooked mixture over everything in your shell and then refrigerate.  This tastes best thoroughly cold so resist the urge to sample this pie too soon.  Wait at least a few hours before serving.

Feel free to top with whipped cream or your favorite frozen topping before digging in.

ENJOY!

Sunday, December 16, 2012

Make Your Holidays More Merry With My Decadent Tahitian Brownie Pie!

My Decadent Tahitian Brownie Pie.jpeg
My Decadent Tahitian Brownie Pie

Besides all those fancy varieties of cookies, a festive dessert to serve family and guests over the holidays is my Decadent Tahitian Brownie Pie.  This delight is a velvety chocolate pie with not quite a custard or a pudding texture that is infused with sweet cherry vanilla that will make your mouth water. 

I used Nielsen-Massey's Tahitian Pure Vanilla Extract, one of the five extracts from my review/giveaway yesterday so do enter after reading this.

When you take a look at my photo above, you might think this resembles more a pumpkin pie than the dark-brown of a chocolate one.  This is just outside deception because once you slice into it the dark-brown chocolate beauty awaits.

Also, I forgot that I made this recipe in the past in a smaller pie pan.  What you are seeing is the size of a 10" shell, which is the reason the filling looks thinner.

a piece of my Decadent Tahitian Brownie Pie.jpeg
This pie is sinfully delicious!

As always, I encourage you to try my no-fail oil pie crust recipe.  This is the only recipe that I use whenever I make pastry for pies, quiche, pot pies, and tarts because it is simply the best and easy.  Trust me when I promise you will make a flaky crust unlike riskier recipes with shortening that if you work the dough too much will result in hard crust.

Another thing I want to mention is to check the type of margarine you have on hand.  Whenever you bake, you need to have a margarine that specifically states it is a margarine and not a spread.  Spreads have more water in them and will spoil baking.  So if you blamed yourself for being a bad baker for something in the past if you happened to use a spread, it was not your fault.  You were a victim of spread.

We finished this pie already and the gang already demanded another.  If your family loves chocolate as much as mine, my bet is they would probably feel the same way so do try this one because it is a winner!

 
My Decadent Tahitian Brownie Pie

unbaked 9" pie shell
1 cup of evaporated milk
2/3 cup of sugar
3 eggs
1/4 cup of a margarine (not spread) or butter
2 tablespoons of Nielsen-Massey Tahitian Pure Vanilla Extract
3 tablespoons of unsweetened cocoa


Beat the eggs and sugar together with your electric mixer until light. 

Cook the cocoa with one-fourth cup of the milk for several minutes to thicken slightly before slowly adding and beating to combine to the eggs and sugar in your mixing bowl.

Add your melted margarine or butter, the rest of the evaporated milk, and the vanilla.  Beat those ingredients together until everything is well mixed.

Pour the mixture into an unbaked 9" pie shell.

Bake in a 400-degree oven for ten minutes before reducing the temperature to 350-degrees for about 40 minutes.  Test with a toothpick to see anything sticks.

Cool thoroughly and top with whipped cream, if desired.   Plain is just as fabulous, but the whipped cream is a nice special touch for guests.

ENJOY!

Saturday, November 17, 2012

Recipe: Resistance Is Futile When It Comes to My Decadent Peanut-Chocolate Pie!


Today, I plan to spoil you with one of my favorite pies.  Imagine digging into a creamy piece of what tastes like a liquid candy bar is what you get with my decadent peanut-chocolate pie!  This terribly delicious way to indulge your sweet tooth is easy to make as well with a base of peanut butter, corn syrup and crunchy peanuts, swimming among melted semi-sweet chocolate chips.  Serve this chilled delight alone or top with a fluffy cloud of whipped cream or topping for ultimate ecstasy.

Those that are reluctant about making homemade pie crust and believe it is beyond their abilities, I do hope you finally try my fool-proof oil pie crust dough.  Sincerely, friends, this crust always turns out flaky and is so much cheaper than buying any prepackaged pie crust.  In fact, you can use this recipe to make a pot pie, quiche, or any dessert pastry likes pies and tarts. 

Trust me, if you want to impress your guests over the holidays serve them this pie and they will be singing your praises because this one is that special!

My Decadent Peanut-Chocolate Pie

1 cup of sugar
1/2 teaspoon of salt
1 cup of creamy peanut butter
1/2 cup of dark corn syrup
3 eggs
1 teaspoon of vanilla
1 cup of dry-roasted peanuts
1 unbaked 9-inch pie shell 
1 cup of chocolate chips
2 tablespoons of butter or butter-flavored shortening
Whipped cream or your favorite whipped topping (optional)

Cream the sugar, salt, and peanut with your electric mixer until fluffy.

All you do next is to add your corn syrup, vanilla, and eggs, beating one egg in at a time until thoroughly combined.

Stir in your peanuts, butter, and chocolate chips into the mixture last and pour into your pie shell.

Cover your filled shell loosely with foil and bake in a 375-degree oven for 30 minutes.

After that half hour of baking, you take the foil off and continue baking for about ten more minutes or until the crust is golden brown. 

Cool and keep refrigerated.

Top with your favorite whipped cream or whipped topping.  This is entirely optional.

ENJOY!

Sunday, August 19, 2012

Sample My Delicious Homemade Banana Cream Pie and Live It Up!

My homemade banana cream pie
Here is my delicious homemade banana cream pie!

Why could be more perfect for a hot summer day than cooling off with a piece of homemade banana cream pie?  With ripe bananas mingling with rich pudding goodness, made even smoother with evaporated milk, and this recipe takes comfort food to a whole new level before being poured into a pre-baked crust.  All it takes is one piece of this chilled pie and you are bound to feel joy as you bite. 

The secret of bringing out the most banana flavor is to let your hot pudding filling cool first before pouring into the banana-lined crust.  This way you won't slightly cook those sliced bananas and lose any bit of that delicious fruit to heat.  Another plus about allowing this filling to cool is that your sliced bananas will not turn dark, but keep their same appearance. 

As I mentioned, I have made many types of pie crusts.  I used to make the traditional shortening type, the hot water method, some recipes that used vinegar in the crust, and still others had baking powder in the mix as a part of the crust until finding my cherished oil pie crust.  All the other crusts can be tricky to work with when it comes to how flaky the texture of your dough will turn out.  On the other hand, my oil pie crust is so easy to make and never undermines your pie-making confidence so it turns out every time with tender, flaky crust.

So the next time you have bananas and are in dire need of a smile, I hope you are tempted enough to make this recipe.  Trust me, but it can do wonders to brighten a day and those around you!

a piece of my homemade banana cream pie
My Homemade Banana Cream Pie

10-inch baked pie shell
2/3 cup of sugar
1/4 cup of cornstarch
1/2 teaspoon of salt
1 (12-oz. size) can evaporated milk
1 can  water
4 egg yolks
1 tablespoon of vanilla
3 large bananas


Take your eggs out  to leave at room temperature while you're baking your pie shell.  This will make it easier for you to separate them.

Stir together sugar, cornstarch, and salt in your pot.

Now that the eggs have warmed, you can separate the whites from the yolks for the pudding filling.  Refrigerate the whites for other uses.

Add the yolks with the milk and gradually stir into the dry ingredients in your pot. 

Cook over medium heat, carefully stirring until the mixture thickens and boils.

Remove from the heat and stir in the vanilla.

Press plastic wrap over your pudding mixture in the pot and allow this to cool at room temperature before pouring into the baked pie shell that you will line with sliced bananas.

Chill the pie thoroughly for about two hours before serving.  You can eat it plain or top with whipped topping or whipped cream before feasting on this.


Saturday, July 14, 2012

Survive the Heat With My Decadent Frozen Peanut Butter Pie!

With this heat wave we've been experiencing all over the country, I thought this would be the perfect time to share a very easy pie recipe that you can pull out of your freezer and serve.  This frozen peanut butter pie has a heavenly, creamy texture thanks to cream cheese and Cool Whip that pumps up its awesomeness for the perfect cool weekend indulgence!

This is one of the rare times that I resort to a graham cracker pie crust over my absolute favorite oil pie crust.  The flavor of those graham crackers mingling with this pie just heightens the flavor in a way that is hard to describe.  Once you make this recipe and taste, you will understand why I think the graham cracker crust is so important here.

My Decadent Frozen Peanut Butter Pie

4 oz. of softened cream cheese or Neufchatel cheese
1 cup of sifted confectioners sugar
1/2 cup creamy peanut butter
1/2 cup of milk
9-oz. container of Cool Whip Dessert Topping
1 graham cracker crust (9-inch size), baked and cooled
1 teaspoon of vanilla extract
1/4 cup finely chopped peanuts (optional)

Whip the softened cheese with your electric mixer until fluffy. 
Beat in the sugar, peanut butter, and vanilla extract. 
Slowly add the milk, blending thoroughly as you go into the mixture. 
Fold the Cool Whip topping into this.
Pour the mixture into your baked pie crust.
If desired, top with the finely chopped peanuts and freeze until firm and ready to serve.

Saturday, June 16, 2012

You Haven't Lived Until You Tried My Chocolate Cream Pie! 

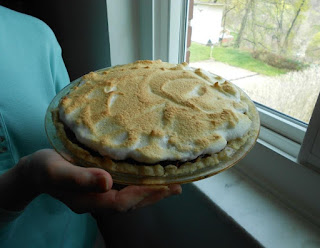
I must confess that I am a hopeless chocoholic.  Like a powerful drug, I am drawn to the dark sweetness and usually require a weekly fix.  For those who happen to share my delicious addiction, then you will love this velvety chocolate pie because it is even made better with a fluffy cloud of meringue topping. 

All that is involved is cooking a homemade pudding like filling and turning out into a baked crust and crowned with baked meringue before chilling for a perfect weekend treat.    One piece of this dark delight and you will feel happy again.

You can use your favorite pie crust recipe for a nine-inch pie.  However, I really hope you will try my absolute favorite oil pie crust recipe because it is foolproof.   I have tried many recipes and this is truly the best in my opinion!

Be sure to leave your eggs at room temperature first for an easier task of separating the yolks from the whites.   Attempting to crack cold eggs usually ends up with a bit of yolk in the whites that will deflate the meringue.  

My Best Chocolate Cream Pie

9-inch baked pie shell
1-1/2 cup sugar
1/3 cup cornstarch
1/4 teaspoon of salt
3 cups of milk
4 egg yolks, slightly beaten
1 tablespoon of vanilla extract
6 tablespoons of unsweetened cocoa
2 tablespoons of margarine (not spread)

Bake your pie shell first.

Stir together sugar, cornstarch, cocoa, and salt in your saucepan.  Blend the milk and yolks together then gradually add to the mixture in your saucepan.  Cook over medium heat, stirring constantly until it thickens and boils. 

Remove from the heat and stir in the vanilla and margarine.

Pour into your baked pie shell and top with the Meringue Topping below.

Meringue Topping:

4 egg whites
1/4 teaspoon of cream of tartar
1/2 cup of sugar

Take out your electric mixer and beat the whites with the cream of tartar.  Gradually add the sugar to the whites while you continue beating until stiff peaks form and all the sugar is used.  Top on filled pie shell and bake at 425 degrees for about five minutes.

Serve chilled.